It's PIE Season! Prepare Your Pumpkins! - A Guide to Making Fresh Pumpkin Puree & What To Do With Those Seeds Too

RSS

Well, Halloween is over, the big box stores are hauling out the Christmas merchandise, and this can only mean one thing: it's pie season. Apple pie, pecan pie, lemon meringue pie, chocolate cream pie, shoofly pie (for you Pennsylvanians), and..........pumpkin pie! To make pumpkin pie, you can resort to canned pumpkin, but honestly, there's something a whole lot more heartwarming, and fresh tasting, about pumpkin pie made from fresh sugar pumpkins. I am one son away from the empty nest. My oldest three sons have all flown the coop and I have 17 year old Paul, my "baby," in his senior year of high school at home. So, one of our pumpkins got carved last week - in to Jake from the cartoon show Adventure Time. That one ended up like this:


Jake


But...we had three more. Two sugar pumpkins from Slattery's farm in West Minot, Maine and a behemoth we have still not dispositioned. Here they are in their full pumpkin-y glory.


Pumpkin1


So, the sugar pumpkins are the ones destined for pies. Paul was happy to help. Step one...wash and cut the pumpkin in half.


PumpkinCuttingCollage
Cut the top with stem off the pumpkin. Then begin slicing in half. If you find it difficult, you can use a soft (wooden or rubber) mallet to tap on the protruding knife edge to help ease it through the pumpkin.

Step two...scoop out the interior seeds and stringy parts.


ScoopingSeedsCollage
The pumpkin will be full of seeds and slimy goop. Take all of that out, either by hand or with a spoon as a scoop, but save the seeds! Paul is putting the seeds in a Ball jar for the time being.

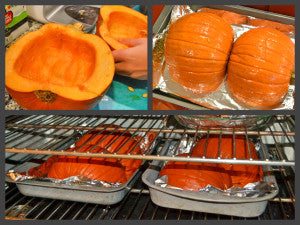
Step three...roast the pumpkins.


GoingInOvenCollage
Once the interiors of the pumpkins are well scooped out, place them cut side down on foil lined baking pans. Place them in the oven at 350 degrees F for about an hour, or until the flesh of the pumpkin is soft and scoopable with a spoon.

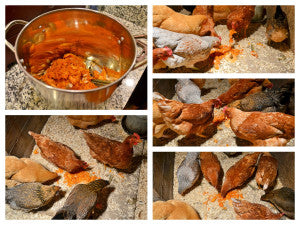
Optional step...feed the goop to your chickens. Don't have chickens? Well, maybe you can compost it. Throwing it away is a last resort. Our chickens LOVED this fresh pumpkin treat.

ChickensCollage


Step four...boil and roast your seeds while you are waiting for the pumpkins to roast.


BoilingSeedsCollage
Prepare the water for boiling the seeds by adding a fair amount of sea salt. Bring the water to boil, add the seeds, and boil for ten minutes.
SeedPrepCollage
After boiling for ten minutes, drain the seeds and thoroughly pat dry on paper towels. Next, spread the seeds in a baking pan and drizzle a small amount of olive oil on to them. Stir them around to coat and roast in the oven with the pumpkins until just turning crispy and brown.
Pumpkin25
Yum! You can munch on these while you're processing your pumpkins.

Step five...scoop out your roasted pumpkins.


RoastedPumpkinScoopCollage
OK, so your pumpkin is roasted and soft and scoopable. Scoop out the flesh of the pumpkin in to a large bowl. Really scrape the sides of the skins clean. The skins may then also be given to your chickens, or composted, or...you know...whatever. If you find that you have a little watery residue in the bottom of the bowl, you can drain the roasted pumpkin flesh in a colander.

Step six...puree and bag!


FoodProcesserCollage
Spoon the roasted pumpkin in to a food processor or blender and process until very smooth. Then measure two cups of puree, because most fresh pie recipes call for two cups per pie, in to freezer bags. Label and freeze if you are not going to make the pies right away. See the next photo for a little tip on freezing.
Pumpkin34
I stack the bags horizontally like this in a flat pan and lay them in my freezer this way. After they are frozen I can bring the pan back out of the freezer, but the handy little bags of puree remain frozen in a flat shape that's very convenient for freezer storage.
My two sugar pumpkins made enough puree for four pies. Now, for Thanksgiving, Christmas, and New Year's, all I will have to do is get one package out of the freezer per pie and defrost it on the counter. It can also be defrosted in a warm water bath or in the microwave. Since I also processed some of the apples from our trees and froze them in September, I am also ready to bake apple pies quickly and easily, just in time for those other three sons to be home as well for the holidays. :) Happy holiday baking and happy hooking! - Beth

Previous Post Next Post

  • Parris House Wool Works
Comments 0
Leave a comment
Your Name:*
Email Address:*
Message: *

Please note: comments must be approved before they are published.

* Required Fields